¶ Guide
Welcome to Gliese. You will start off spawning in one of hundreds of possible locations. Nearby, other players will have started their own settlements. If you're lucky, they will be friendly, but if not, you will want to be prepared before you make contact with them. This guide will talk you through the first steps of starting your civilisation.
Be warned! Gliese is in an experimental stage of development - the game is likely to be buggy! Please leave any feedback or bugs in the discord

¶ Wait until morning
Things are dangerous after dark on the planet Gliese. You'll want to wait until 5 past the hour or 35 past the hour before embarking for the first time, to have as much time possible before nightfall.
¶ Make a character
¶ Step-by-step - make a character
Make sure `New Character`is selected (use arrow keys)
Press `SPACEBAR` to create a new character
Wait for a character name to appear in the menu
Press `SPACEBAR` with the character selected to view the character
Characters will be assigned a randomly generated name and appearance on creation. Note that all of your characters will have the same surname.
If your character is out of hit points, you can kill it off by pressing
j, typing/dieand pressingENTER. You can then get to the character list page by pressingx
Known bug - make sure your capslock key is off! Typing in caps causes issues at the moment.
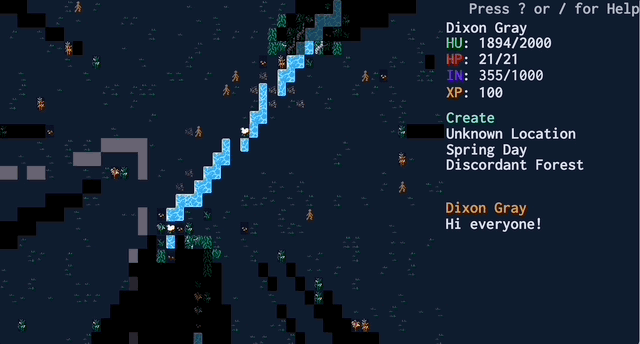
¶ Look at the main screen
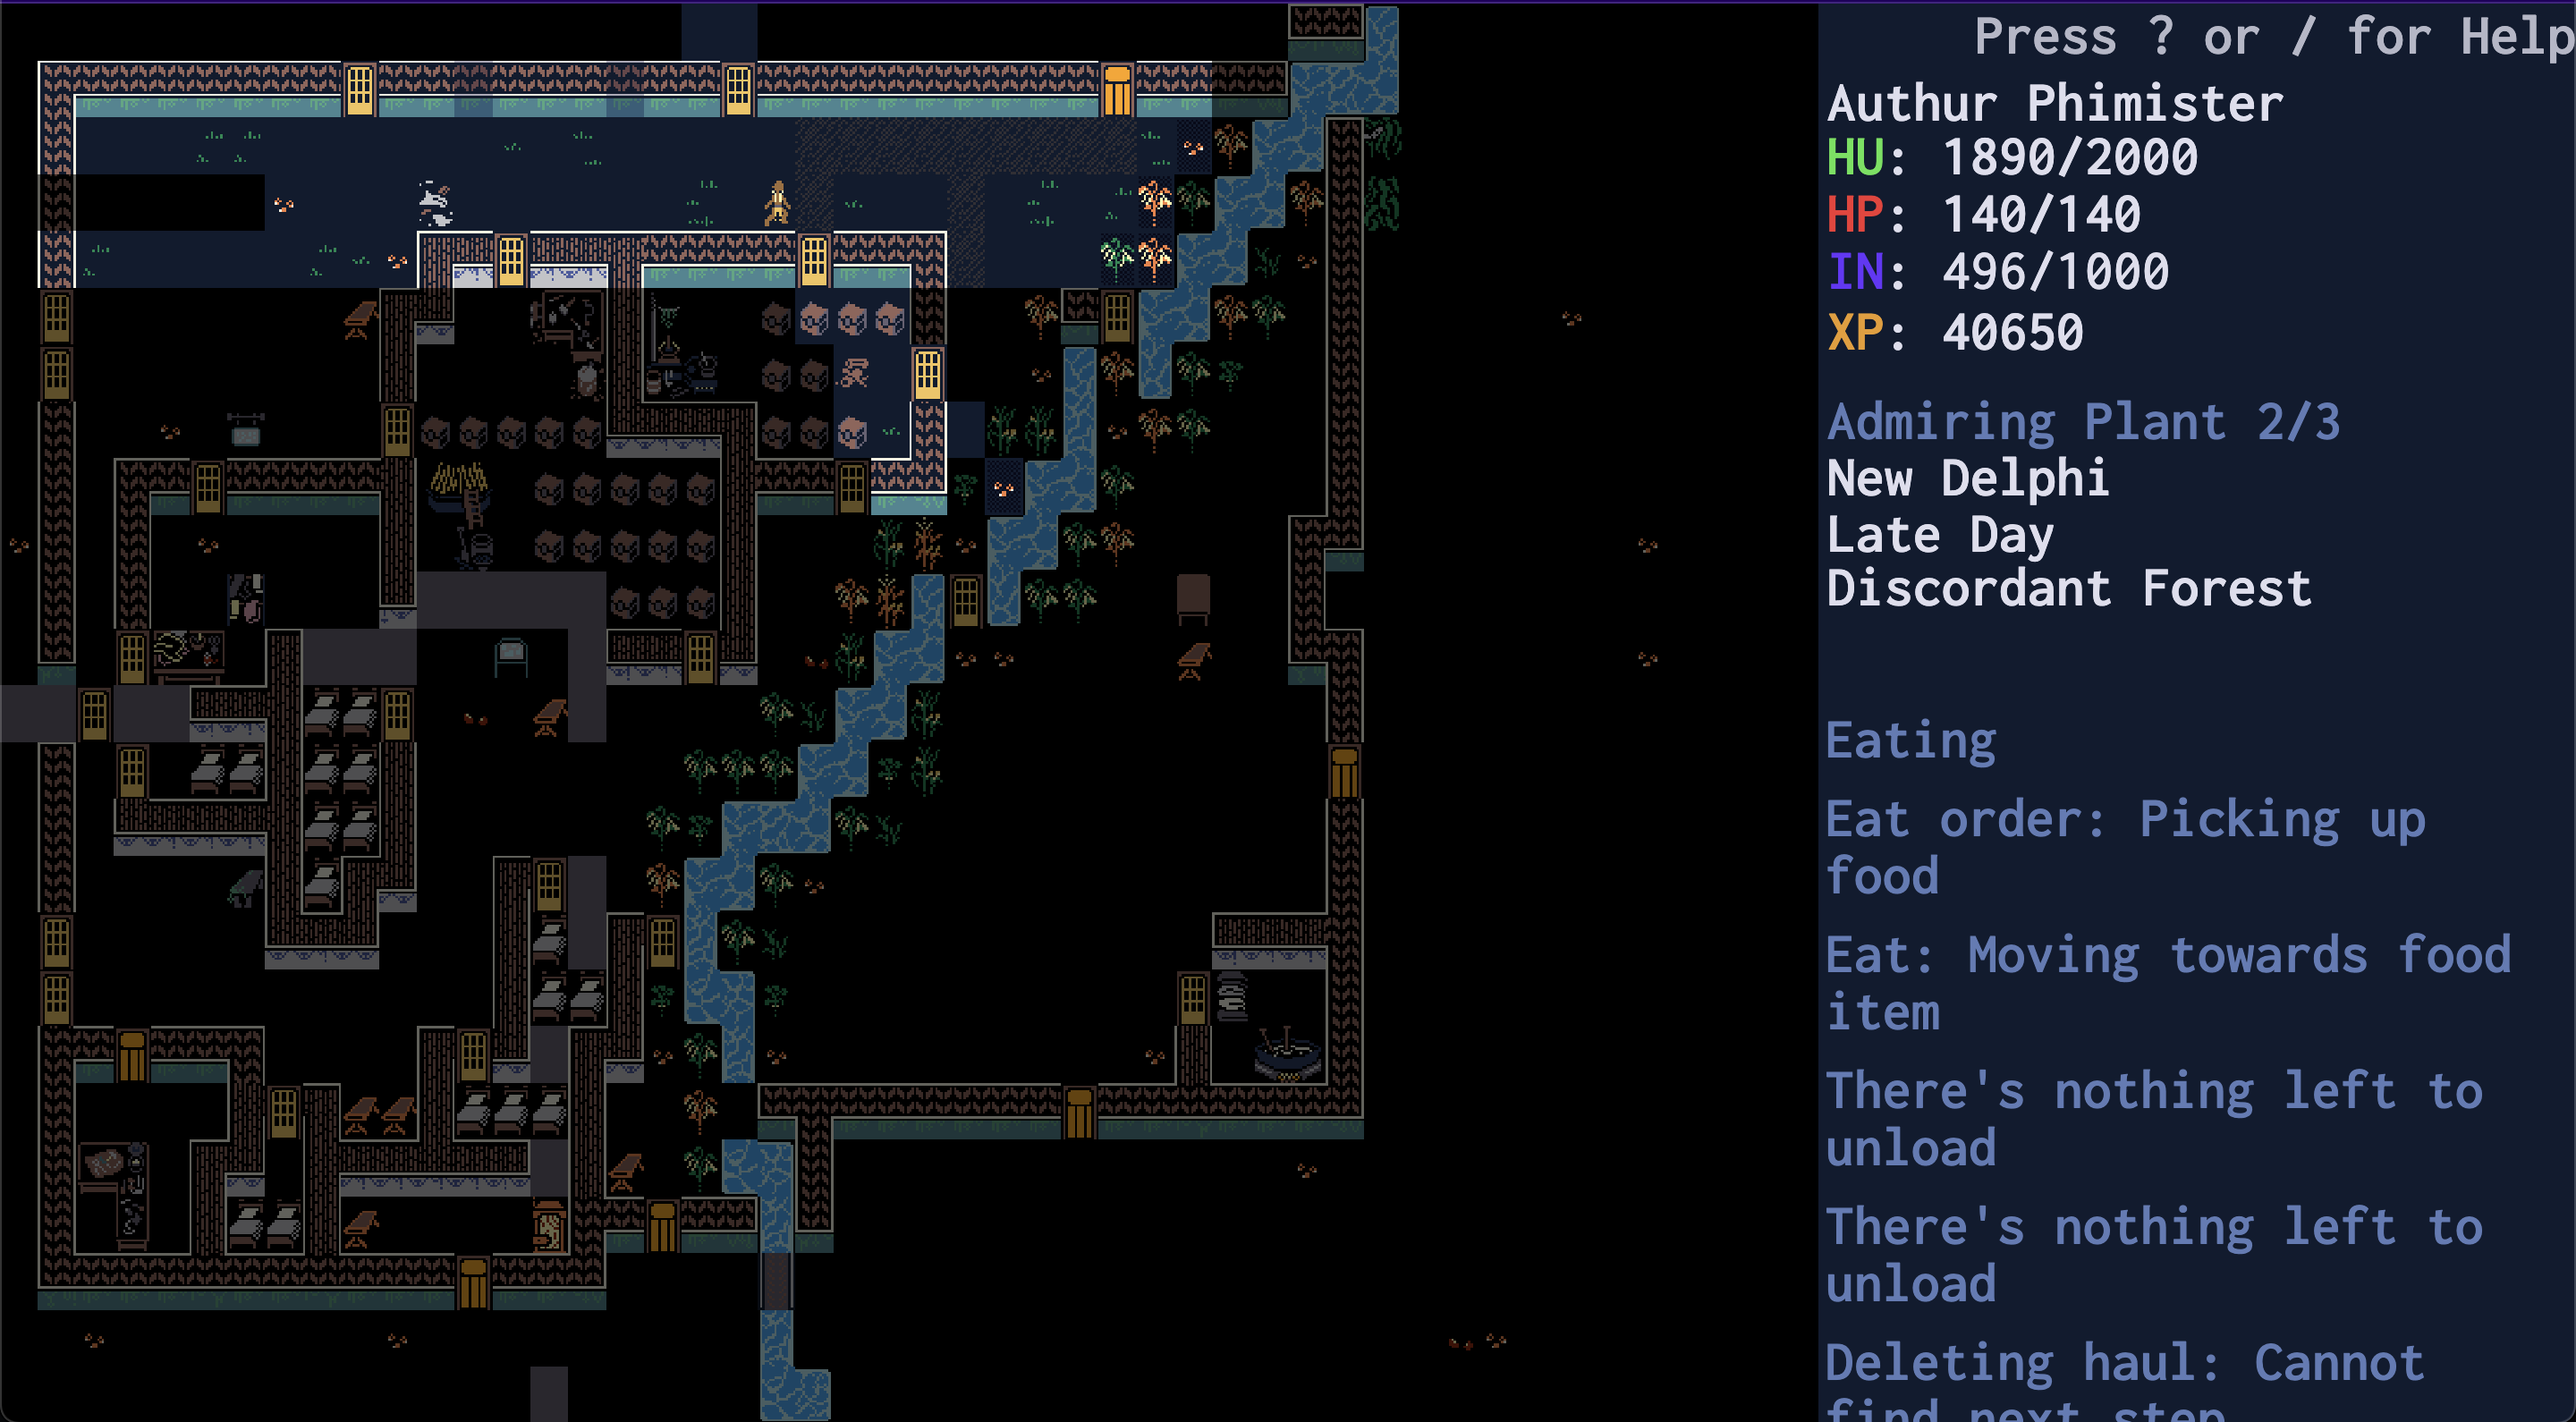
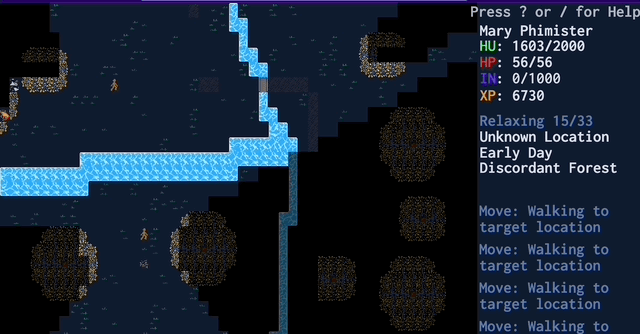
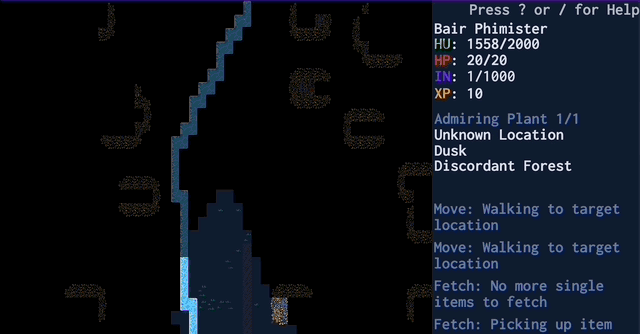
On the left is a view of your current location. You can highlight your character by pressing l (the letter L). You can use the arrow keys to look around, and press ESCAPE to stop looking.
On the right you see details about your character at the top. Their name, followed by their hunger, health points, inventory size, and experience points.
Beneath that you see what their current activity is, and how far along they are. The screenshot shows a person admiring a plant. They are 2/3 of the way along the current step of that activity.
Then comes the location name, the time of day, and the location biome.
Beneath that is the events log, which shows the most recent activities relevant to that character.
¶ Name your home town
¶ Step-by-step - name your town
Press `a` to open the location naming input
Type in a name for your first settlement
Press `ENTER` to save the location name
Feel free to be as creative as you like. All of your characters will be able to see this name whenever they're stood on this screen, but other players will not.
¶ Say something
¶ Step-by-step - speak
Press `j` to open the speak menu
Type in some words
Press `ENTER` to speak
Everyone in your location will be able to hear you
Please report any hateful or bullying speech in the discord. Any players abusing speech will be banned
¶ Walk around aimlessly
¶ Step-by-step - move
Press `m` to start the movement select
Use the arrow keys to choose target location
Press `SPACEBAR` to begin walking there
Note that orders are QUEUED UP
Multiple move orders are executed IN THE ORDER YOU MADE THEM
You can queue up move orders. Do this a few times. Your character will attempt to walk to each of these spots one at a time, in the order you did them in.
If you don't keep your character busy, they will become 'idle' and wander around their current location to admire plants, daydream, or just generally relax. They will not walk off screen but will happily wander into any dangers or difficulties in your current location.
Experiment with moving around the world. Move to the edge of the screen and notice that the select box turns pink and has a number in it. If you keep pressing the same arrow key that number will increase - this indicates your character is planning to move that many full screens across the world. If you're feeling brave, go ahead and give it a try - but be careful. If you see any scary looking animals on your travels it's best to just run the other way for now.
Be careful when entering new panels - they could contain dangerous animals that will attack on sight. A good way to check for this is to press the
fkey when you've entered a new panel, to list all characters and animals on the screen. If you see a creature rapidly approaching your character, move back to your original panel
You can move back to your home screen from anywhere in the world by pressing
mtwice which pulls up a location select menu. From there you can selecting your home. Characters will not always be able to figure out their way back alone - check the movement section of the orders page for more details.
Characters cannot cross rivers which are more than one tile wide - if you try to tell them to do things on the other side of a wide river, they will cancel the order.
You can stop your character from carrying out their current order by pressing
BACKSPACE. You can stop your character from carrying out ALL currently executable orders by pressingSHIFT + BACKSPACE- this will stop them in their tracks unless they are idle.
¶ Get familiar with the orders screen
Once you've queued up some movements, press u to look at the order scheduler menu. This shows you what orders are assigned to your character and lets you delete them, change their priority, or set them to repeat.
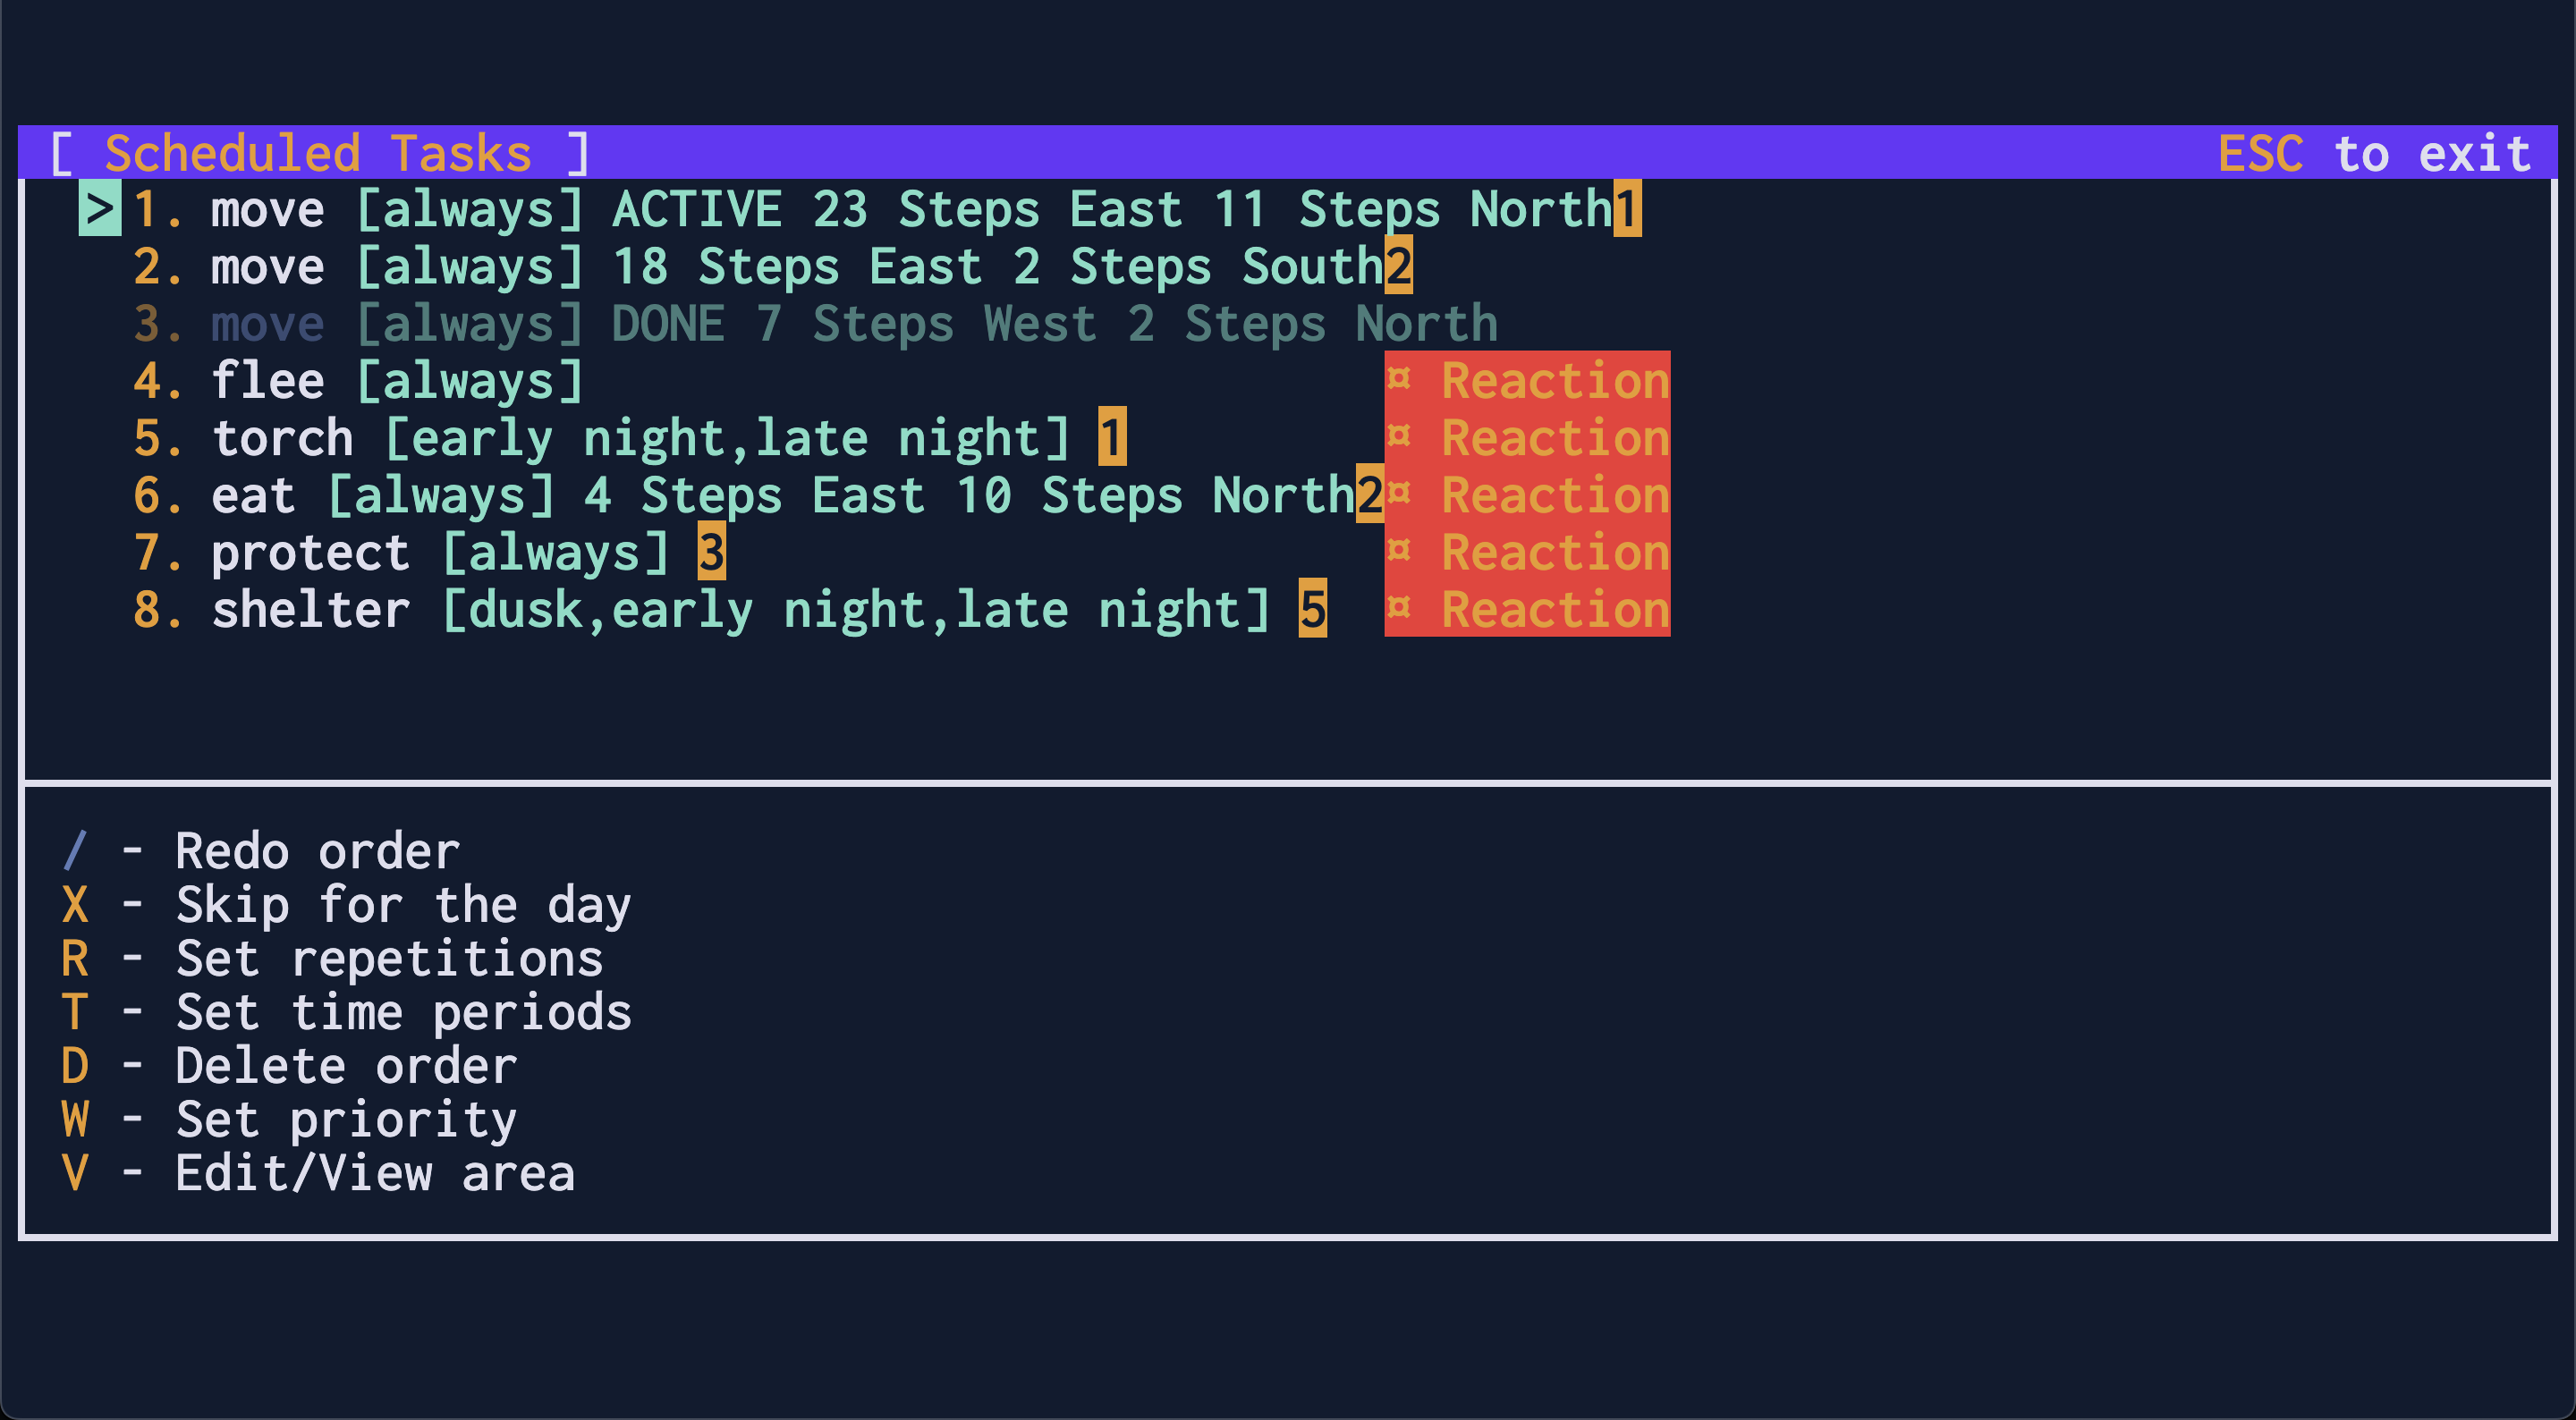
In the screenshot, you can see that the player queued up three move orders. One of those (shown with greyed out text) was already completed. The others are listed at the top of the list in the order they are scheduled to be completed. The currently active order is marked as ACTIVE.
To cancel a move order, use the
ARROW KEYSto highlight the order, then pressdto cancel it
The list of completed orders is cleared once every thirty minutes when a new day begins.
Below the move orders are special Reaction orders that all characters start with. These orders are triggered when certain conditions are met and will overwrite any scheduled orders in that case. You can read more about them on the orders page.
¶ Gather some brush
¶ Step-by-step - gather brush
Press `g` to open the gathering menu
Scroll down to `brush`
Press `SPACEBAR` to begin the brush area select
 Highlight some plants. Some plants drop brush
Use arrow keys to choose start of area select
Press `SPACEBAR` to lock in the starting square
Use arrow keys to choose end of area select
Press `SPACEBAR` to begin gathering brush
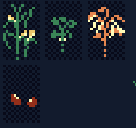
The smallest green plants are not gatherable
All other plants are gatherable - here are some examples of plants that drop brush
Gliese is quite a dangerous place at night. The main threat are Skyshrouds - monsters that come out at night and attack any people they can find. The good news is, they are afraid of fire. Because of this, the first aim for any budding adventurer looking to make it through the night should be to make some torches.
Characters will drop the brush on the floor once it's gathered. Collect the brush.
Torches will not protect you from all of the dangerous animals on Gliese - only Skyshrouds are afraid of fire.
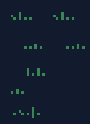
Gathered brush looks like this:

¶ Step-by-step - pick up brush
Wait until your character has gathered brush
   - you will see a brush icon appear where your character was standing
Press `m` to start the movement select
Use the arrow keys to highlight the brush icon
Press `SPACEBAR` to move to the brush
Press `i` when your character is stood on top of the brush to open the inventory
Press `RIGHT ARROW KEY` to select the tile you are stood on
Use the `DOWN ARROW KEY` to scroll down to the brush
Press `SPACEBAR` to pick up the brush
   - if there is a quantity select, press `SPACEBAR` again to pick up the brush
Notice the brush move to the left hand side of the screen
   - it's now in your inventory
Press `ESCAPE` to hide the inventory screen
To stand still, press
won the main screen. Your character will stand in place for 1200 ticks. You can cancel this order by pressingu, and thendon the Scheduler page with the order selected.
If you are still gathering items while you try to pick up, your character will not pick up the items right away. They'll finish their gather order first, and only then try to fulfil your order to pick items up.
There you go! You're doing things! Time to craft your first workshop.
¶ Make some torches
¶ Step-by-step - Builld woodcollier's workshop
Ensure you are holding 2 brush
Press `k` to open the workshop menu
Scroll to `Build new workshop` with arrow keys
Press `SPACEBAR`
Press `s` to search for a specific workshop
Type in `woodcollier`
Press `ESCAPE` to hide the filter input
Press `SPACEBAR` to start workshop placement
Press the `ARROW KEYS` to choose a place to build it.
Press `SPACEBAR` to start building the woodcollier's workshop
Your character will move faster if they are holding fewer things - try to ensure they are only holding two brush at a time
¶ Step-by-step - make charcoal
Ensure you are holding 1 brush
Press `k` to open the workshop menu
Scroll to  `Woodcollier's` with arrow keys
Press `SPACEBAR` to open the woodcollier's workshop menu
Scroll to `Charcoal` with arrow keys
Press `SPACEBAR` to choose how much charcoal to make
Type in the number `1` (one)
Press `SPACEBAR` to begin making charcoal
¶ Step-by-step - make a torch
Ensure you are holding 1 charcoal
Press `k` to open the workshop menu
Scroll to  `Woodcollier's` with arrow keys
Press `SPACEBAR` to open the woodcollier's workshop menu
Scroll to `Torch` with arrow keys
Press `SPACEBAR` to choose how many to make
Type in the number `1` (one)
Press `SPACEBAR` to begin making a torch
One the torch has been created, press `i` to open inventory
Press `RIGHT ARROW KEY` to select the tile you are stood on
Scroll down to torch with `DOWN ARROW KEYS`
Press `SPACEBAR` to pick up the torch
   - your character will light it at night automatically
Press `ESCAPE` to hide the inventory screen
That should be enough to keep them safe for a few nights. By default, characters will light torches at nightfall. You can change this behaviour by adjusting the Torch order in the Scheduler with u. See orders for more detail
¶ Make a torch hat
A torch is all very well and good, but your character needs two hands to do useful actions like gathering wood, or building walls. You won't be able to achieve much at night other than not dying if you have to hold a torch the whole time. Luckily for you there's a unique piece of clothing every beginning player should wear to free up their hands - the torch hat.
¶ Step-by-step - make a primitive tailor's workshop
Ensure you are holding 2 brush
Press `k` to open the workshop menu
Scroll to `Build new workshop` with arrow keys
Press `SPACEBAR` to open the new workshop menu
Press `s` to open the filter
Type `Primitive tailor` to filter the workshops
Press `ESCAPE` to leave the filter input
Press `SPACEBAR` to start workshop placement
Press the `ARROW KEYS` to choose a place to build it.
Press `SPACEBAR` to begin building a primitive tailor's workshop
¶ Step-by-step - make a torch hat and equip it
Ensure you are holding 2 brush
Press `k` to open the workshop menu
Scroll to `Clothing - Primitive Tailor's` with arrow keys
Press `SPACEBAR` to open the primitive tailor's workshop menu
Use the arrow keys to scroll down to `Torch hat`
Press `SPACEBAR` to begin describing your torch hat
Type in a description for how your torch hat looks
Press `SHIFT + ENTER` to begin crafting a torch hat
Wait until your character has finished creating the torch hat
Then press `i` when stood on the torch hat to open the inventory
Press `RIGHT ARROW KEY` to select the tile you are stood on
Scroll down to the torch hat with `DOWN ARROW KEY`
Press `SPACEBAR` to pick up the torch hat
Press `LEFT ARROW KEY` to select your inventory
Scroll down to the torch hat with `DOWN ARROW KEY`
Equip the torch hat with `.`
Press `ESCAPE` to close the inventory
You will see your character's icon is updated to show it wearing a torch hat
Known bug: The torch hat has to be equipped before you equip the torch for it to work properly. If you already have a torch equipped, it's best to unequip it and re-equip it once you've put the hat on
With a torch hat equipped, you can chop down trees while holding a torch on your head. Without it, a character can either chop wood or hold a torch - not both at the same time
¶ Make a stockpile
Gather fifteen or so brush but do not pick it up - leave it on the ground for now. So far you've been doing fine carrying around all of the ingredients you need to make your things. For any bigger projects, you'll need to a stockpile for your character to store items in.
¶ Step-by-step - make a stockpile
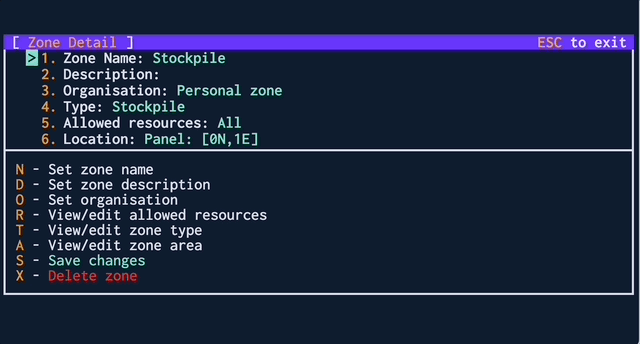
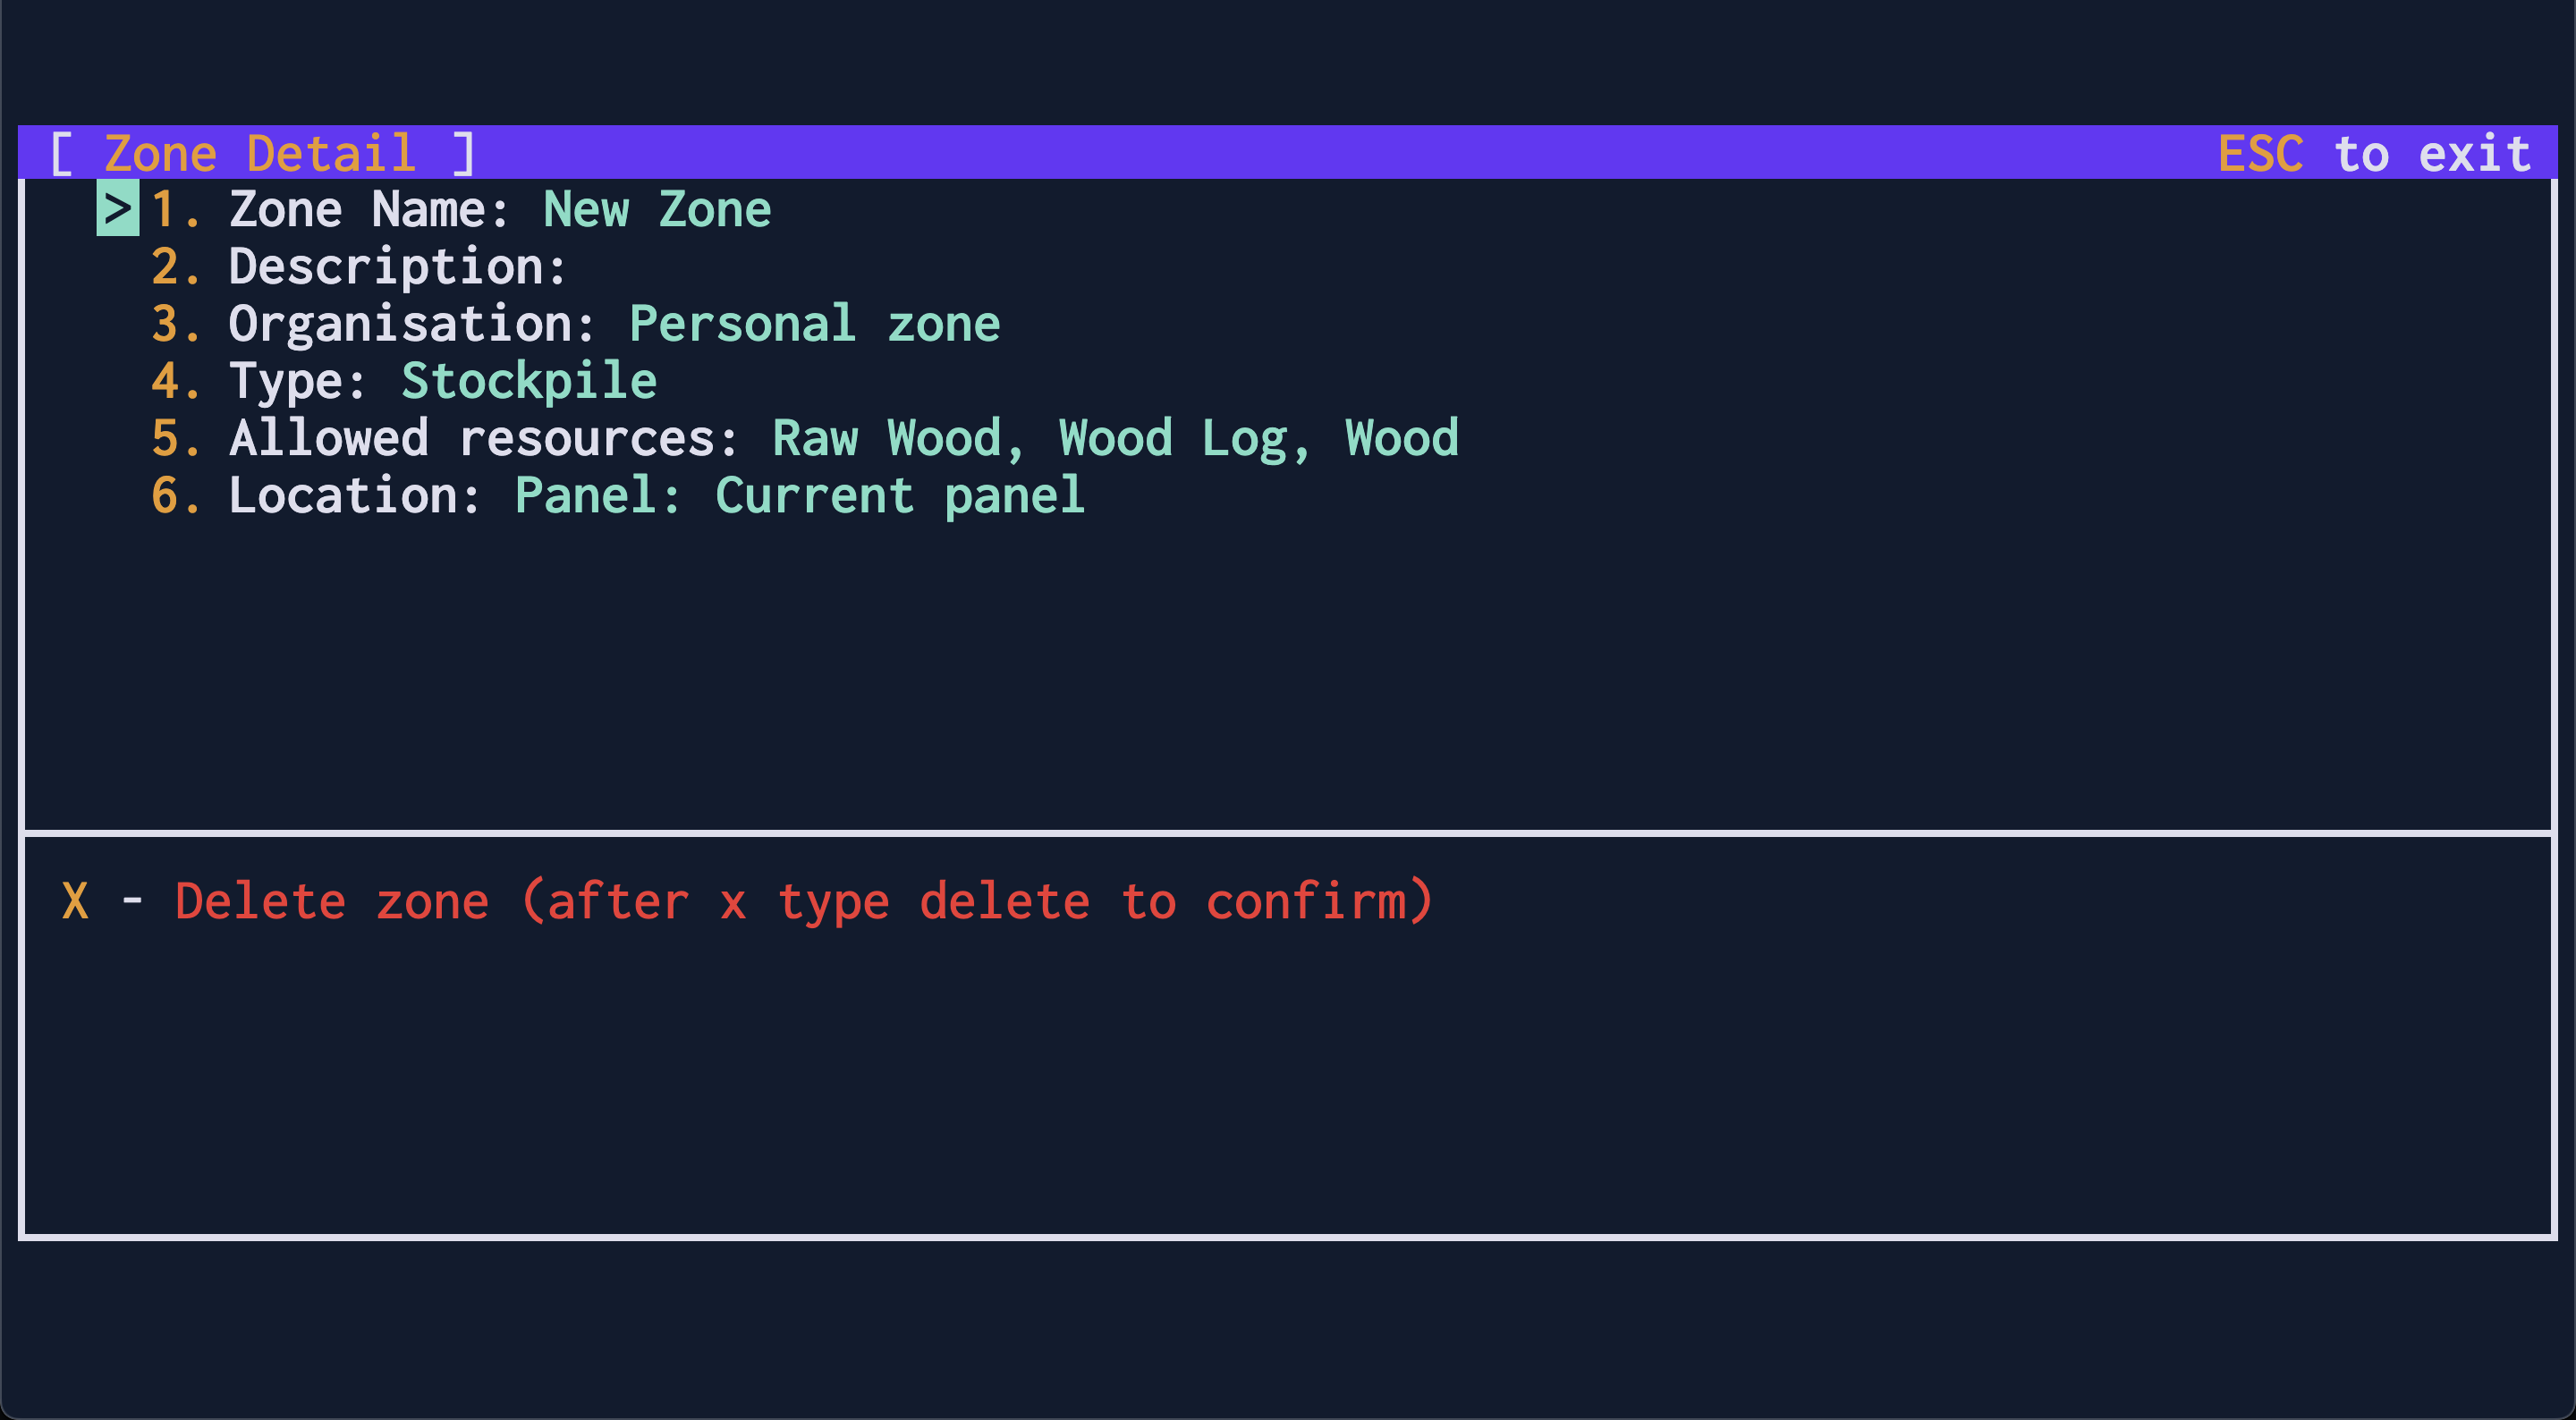
Press `n` to open the zones menu
Press `c` to create a new zone
Scroll down to the `New zone` that was created with the `DOWN ARROW KEY`
Press `SPACEBAR` to open up the zone menu
Use the arrow keys and `SPACEBAR` to fill in the zone details
   - fill in each sub menu, `ESCAPE` gets you back to the main menu
Items 3, 4, and 5 can all be left as their defaults for now
Item number 6, the Location, is particularly important
Make sure you assign a location to your stockpile - otherwise it is useless. You assign a location to a stockpile by scrolling down with the arrow keys to the item titled
6. Locationin the stockpile screen and pressingSPACEBARand then selecting the area using the area selection tool.
¶ Deposit your brush into the stockpile
There is a slow manual way, a medium way, and a faster automatic way to fill your stockpiles. They all have their uses, depending on the situation. Try all three out now to get used to them.
¶ Step-by-step - manually fill your stockpile
Pick up items from the floor with the inventory menu (`i`)
Move to the stockpile with the move command (`m`)
Drop the items on the ground from the inventory menu (`i`)
¶ Step-by-step - unload items to drop ALL items you're holding
Pick up items from the floor with the inventory menu (`i`)
On the main screen, press `d` open the stockpile selection menu
Scroll down to your new stockpile with the `DOWN ARROW KEY`
Press `SPACEBAR` to begin dropping the items you picked up at the stockpile
 ALL the items in your inventory will be dropped.
 If you limit the stockpile to certain resource types, only those types will drop
¶ Step-by-step - haul items
Press `h` to open the stockpile selection menu
Scroll down to your new stockpile with the `DOWN ARROW KEY`
Press `SPACEBAR` to begin selecting the area you want to haul FROM
Define an area with the `ARROW KEYS` and `SPACEBAR` to begin hauling
Setting a haul order for a large amount of heavy items is generally more efficient than picking them all up and carrying them to the stockpile in one go. This is because your speed is exponentially slowed down based on the weight of your inventory. However, characters are not smart enough to haul more than one item at a time. For lightweight items such as seeds, it's actually less efficient
You can view and search the contents of all stockpiles on the current location by pressing
s
¶ Make some walls
Okay great, you'll probably survive the first night. Torches are all well and good, but they won't protect your characters or belongings from other players. There's also a chance you run out of brush and your torches all die - then what will you do? The answer - build some walls for your characters to hide behind
The cheapest walls are brush walls. They take two brush. And three brush is a brush door. Once you have enough brush, press k and Builder's Yard from the menu, then select the Brush wall. Pick an empty space to build it and then watch in delight as your little tyke gets to work following your instructions. Eventually you'll want to wall off your workshops and some space for storage.
For now, make a little house for emergencies. You'll need 17 brush for the smallest possible house of 3x3 with one door.
¶ Step-by-step - build a brush wall
Ensure you are have brush stored in a stockpile
Press `k` to open the workshop menu
Scroll to `Builder's Yard` with arrow keys
Press `SPACEBAR` to open the builder's yard workshop menu
Press `s` to open the menu filter input
Type in `Brush wall` to filter the workshop menu
Press `ESCAPE` to close the filter menu
Press `SPACEBAR` to begin the wall select
Use the `ARROW KEYS` to choose where to start your wall
Press `SPACEBAR` to begin the area select
Use the `ARROW KEYS` to choose the width and height of your wall
   - the WHOLE AREA will be filled with walls
Press `SPACEBAR` to begin building the walls
   - Your characters will Shelter indoors at night
Remember to build at least one door (a brush door, for now) for each building, else you won't have access and will have to knock a wall down with a sledgehammer
Your character will attempt to build a wall at EVERY square highlighted by your area select tool. If you select a 3x3 square, they will not leave space inside or space for a door.
Brush walls are the cheapest but they're also the easiest for rival players to destroy. You'll eventually need wooden walls to feel a little more secure from attack.
¶ Disable the shelter order
Now that your character has a home, they will choose to hide inside every time dusk falls so they don't get attacked by skyshrouds. This is ideal behaviour if they are not holding torches, but when they have a torch equipped it slows them down.
¶ Congratulations! You've made your first settlement
Depending on how much time you spent to get here, the day may be drawing to an end. You'll know this is happening as you'll see the vision radius of your characters begin to decrease. You could also check the time - a full day and night cycle lasts 30 minutes on Gliese. By default your character will go inside on their own at dusk. They will refuse to go outside until dawn unless you disable their Shelter order (see orders)
Now is probably a good time to mention hunger and hp. If you look in the top right of the screen, you'll see your hunger listed next to HU and your HP listed beneath it. Once your hunger reaches zero, your HP will start to drop. The good news is - you won't starve to death. Once you reach
1 HPyour character becomes desperate enough to eat whatever twigs and rocks they can find to sustain themselves. The bad news is, you're a sitting duck if anyone does want to cause you harm. Try to stay out of trouble for now - it will take a little while before you have a reliable food source.
¶ Gather some raw wood
Now that your immediate survival is ensured, it's time you get started on building up a fledgling economy for your new settlement. That means setting up some component production flows.
The carpenter's workshop (4 brush) will be the first thing you need. Create one, and when that's done, create a Primitive axe from the carpenter's workshop menu. The axe is unsurprisingly used to chop down Raw wood. Raw wood is processed into wood logs which finally become wood, which has many uses, not least of all making beds.
Once you've made your axe, pick it up. To gather wood, find some trees. You may need to travel across the world into other locations to find anything that looks promising. Look them up in plants - you are looking for ones that produce raw wood, ideally with a high drop rate.
You can read descriptions of plants, as well as many other things, by pressing
l
Once you've found a suitable looking plant, press g and then Wood or components to set your character chopping. You'll want to keep going until he's gathered a decent collection of raw wood - 5 pieces will be enough for now. Don't pick up your wood just yet - leave it on the ground. There's too much to carry all in one go, so haul it to your first stockpile.
When gathering wood or components, plants may not drop an item every time. You can see the plant's drop rates in the wikipedia by selecting the plant from the list in the plants page
Your character will be a little slow when he first starts chopping down trees. He gets faster with practise
¶ Make some wood
Watching your little character running around is all fun and games, but for things to get done more quickly you're going to need more than one character. To make more characters, you need beds - at least one per character. To make beds, you need wood. Not raw wood, but nice, finished, processed wood.
Make the Wood Mill. Next, make wood logs at your wood mill - you'll want to convert all of your raw wood except four to wood logs. Haul the wood logs back to the stockpile once they're created.
Characters will only check stockpiles and their inventory for ingredients when crafting things.
Now make the Wood Shop, which will use your remaining raw wood and the majority of the logs you made. All of that should take a little while to get done - make sure you don't run out of torches while you work. Once you have those two workshops, you can create tasks at each workshop to create another Wood Log, and finally to create Wood.
¶ Make some beds
Once you have enough wood, you can create beds. Beds are made at the carpenter's workshop. You'll need 2 beds before you can spawn your second character.
Once you have more characters, you'll want to set up some with recurring orders to handle this flow automatically.
The first bed you create can use one of any type of component - wood is just generally the easiest component to create. Beds get more expensive the more you have
It's useful to put your beds inside - that way newly created characters won't spawn directly into danger.
¶ Move and disown the bed
You'll need a furniture mover to actually move the bed. It's created at a carpenter's and costs 3 wood. Once you have it, move your character to the place you want to drop the bed off at. Then press g and select haul furniture, and select the place the bed currently is. Once the bed has been dropped off in its new location, disown it by pressing g and disown furniture. You'll need the bed to be unoccupied before you can spawn a new character with it.
¶ Spawn a new character
Press x to go to the character select page, then New character. Select the bed you just created and voilla - a new character will spawn safe and sound in their brand new bed.
¶ Make an organisation
Now that you have multiple characters, it's beneficial for you to make an organisation for them. Characters in the same organisation can share stockpiles, as well as defending each other from attack.
Switch back to your first character for now (using x) as you'll probably want them to be in charge of the organisation. Press o to see the list of organisations. Then press n to make a new one. A good name for your first organisation is the last name of your character - all characters you control will share this last name, so you can invite them all to this organisation to let them share resources together.

You can make as many organisations as you'd like. Later on, you may want to have settlements located near valuable resources or mines. Generally it's useful to have at least one organisation per settlement.
¶ Next Steps
At this point you have formed a fledgling society. Nearby will be other settlements created and run by other players. It could be that your neighbours have already made contact with you and seem friendly, in which case you could start off interacting with them - forming societies with other players is the whole purpose of Gliese and is probably the funnest thing to do in the game. You will be much stronger if you join a group than if you try to go it alone.
That said, how you play is up to you. From here on there are many options you can explore, from setting up your characters as explorers and traders, to founding a hermit colony, to working together with your neighbours.
Here are some ideas for ways to continue to build up your society. You can read some of the other guides or chat in the discord for more ideas.
¶ Automate your wood creation
Choose one of your characters to be a designated woodsman. Create a stockpile near your wood workshops which can only hold raw wood, wood logs, and wood.
Stockpiles can be set to only hold certain resources by selecting the
Allowed resources. For our wood stockpile, deselect all of the resources on the left hand menu, then go to the right hand menu, presss, and type inwood. PressESCAPEand select the top three items.ESCAPEout of the resource selection screen and you'll see a summary of the allowed resources back on the zone details page
Go into their orders sheet with u and delete all of the completed orders that are listed there. You'll want their order sheet clear to simplify setting up their recurring orders.
Set them to gather wood across the whole screen, from the very top left to the very bottom right (if there is a large river, only select the side of the river they are stood on). As they begin working on chopping down their first tree, set them to haul from the same area to your newly created stockpile. Then set up an order for them to create 10 wood logs. Set an order for them to haul from the Wood Mill to the wood stockpile. Then create an order for them to create 10 wood. Finally, set an order for them to haul from the wood shop to the wood stockpile.
Go into your orders list by pressing u. You'll see your queued up orders all listed in the order you made them. Scroll down to the bottom order that you set up - this is important as recurring orders are always executed after single time orders.
Set each one in turn to be recurring by pressing r and choosing Repeats Daily - starting with the last, and finishing with the first. That will set the order to be executed once per day. Next, you can specify when you want the orders to be executed. If you would like your character to shelter inside at night time, and your workshops are inside, you can set him to gather and haul during the daylight hours and only craft in dusk and night. Use t on each order to specify that.
Once your character's axe breaks, he won't be able to fulfill their recurring orders. Make sure another character is in charge of keeping a supply of axes at a stockpile.
¶ Make some food
The top right shows your HU - your character's hunger stat. Once that drops to zero, they'll quickly start losing HP - health points - making you an easy target for hungry foes. You won't starve to death. Once you reach 1 HP your character becomes desperate enough to eat whatever twigs and rocks they can find to sustain themselves. But you want to avoid that where you can - especially for characters that navigate out in the world. Getting low on health will make you easy pickings for any unfriendly characters or animals you might encounter.
Have a character create a kitchen. You're likely to have spawned somewhere close to some edible plants - you should be able to determine which ones based on the recipes you can see in the kitchen workshop.
You can gather seeds from those plants in the same way you gathered brush - or gather vegetables with the Gather Fruit & Vegetables command under g. The farming guide will walk you through everything you need to do to get regular food set up, but as a short summary - you'll need a plough to create farm plots next to water, seeds to plant new plants, and a hoe to tend them and harvest them.
I would not recommend trying to get any meat in your diet at the moment - if you try to hunt even a fish, it will probably be more than a match for an unskilled and untooled little guy.
¶ Make stronger walls
Brush walls are all well and good, but a determined guy can knock through one pretty quickly with a Primitive sledgehammer. Wooden walls are a little stronger.
Constructions are created damaged and must be repaired. They can be repaired by a character holding a hammer. The exception to this are brush constructions - they are one hit away from breaking and cannot be repaired beyond that.
You'll also want to create locks for your doors. The wooden lock is the most useful, as you can create keys for your character to move freely through them. Less useful but cheaper are wooden barricades. These block all movement from one direction, so they could be useful if your neighbours have sticky fingers, but they are cumbersome.
¶ Make some armour
A wooden shield and pointy stick can be made in a carpenter's workshop. Once these are created and picked up you'll need to equip them which can be done from the inventory (i) or in the character eqipment menu (q)
Known bug: Armour and weapons don't appear as equipped. Don't worry, it's there and will offer some protection to your character
¶ Hunt some animals
Hunting animals is not without risk - even the calm ones tend to fight back. But if you're careful your strongest guy should be able to take some of the weakest creatures by now.
First, find your highest level character. Ensure he's equipped with the finest armour and weaponry you can make (unless you've had the good fortune of already finding a mine, that's probably a wooden shield and a pointy stick). Make sure he's well fed and at full HP.
Set your home location. To do this, press a and choose a name for the location. Your character can only flee to named locations, and can also walk to named locations from anywhere in the world if you press m twice.
Find a weak looking animal somewhere, not on the same location as your home. Before you tell your character to attack an animal, go into their order scheduler and turn their flee order on. You'll need to set a location for them to flee to - this should be your home base - and you'll need to set a health limit. I'd just set this to one below their total health for now.
Tell them to attack the animal and watch them fight - if you've chosen well they won't be killed in one hit by the animal they're fighting, and will flee back home once they've taken some damage. Wait until their health is back to full and repeat this little dance until the animal is dead. Gather its remains and congratulations! You should be able to turn them into some useable components
Known bug: Don't set your fleeing health limit to a higher value than your current health - it will cause issues the second you try to change locations.
¶ Make some clothes
You can make simple clothes with brush. Consider giving your characters different outfits to differentiate them or denote rank. Check out the Primitive Tailor's for a start.
¶ Automate Things
You can set orders to repeat every day for your characters to work all day long. You can also set some characters to be guards that will jump to the defence of any other character in your organisation they see being attacked.
¶ Go spelunking
There are mines scattered around Gliese - they have easy enemies in the early layers and more dangerous enemies later on. You can gather minerals in them which unlock the rest of the tech tree.